

Are you looking for a fun and easy way to kill some time during your free time? If so, check out our DIY ball shooter! This project is simple and can be completed in just a few minutes, allowing you to spend more time enjoying your hobbies instead of waiting for them to finish.
Description:-
This instructional robotics kit provides explanatory content and a methodology to teach robotics in a way that engages students and helps them achieve a real understanding of different scientific concepts. The kit helps in developing the necessary skills needed to be successful in the 21st-century workplace.
Improve your knowledge about the basic mechanical skills as you learns the functions and workings of this machine.
Vehicle play a very important role in your child’s growth as it helps in his or her motor and cognitive development. They also are helpful in the child’s efficient hand-eye coordination.
Unboxing of machine 7 in 1 kit:-
The kits include ready-to-make models using which you can save time and give shape to ideas in an easy and fun-filled manner.
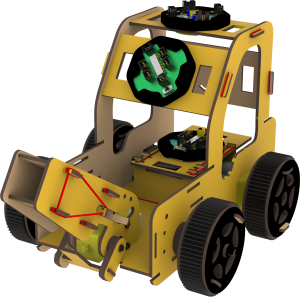
Construction of Ball Shooter:-
For the construction of Ball Shooter you required two sheets M1 & M5. Each of the sheets have their own customized parts which has been named as F1, F2, F3 and so on. Which will help in constructing the model. You can download the manual from here.
Your Ball Shooter Structure is ready. Now you are ready to play it using mobile application.
Bluetooth selection:-
There are two varients of Bluetooth module available you have to first identify the Bluetooth module that has been provided to you, and on the basis of that you have to select the app.
Such as, if you have HC-05 bluetooth module than you have to select the app Bixchamp Legacy and if you have HM-10 bluetooth module than you have to select the app Bixchamp.
Your Machine Kit CPU block comes with preloaded code, that makes it compatible with the Mobile App. The App connects with the CPU block using Bluetooth Connection. Every Kit has a unique Bluetooth module.
Download BixChamp app:-
Android:-
IOS:-
- For HM-10 Bluetooth Module click here.
Ball Shooter play using BixChamp:-
After constructing the Ball Shooter now is the time to play it wirelessly using your mobile as the controller. The Ball Shooter model has a dedicated bluetooth module which will help in sending and receiving of the data from our mobile bluetooth connection.
Controller identification:-
At the heart of every kit CPU is the microcontroller responsible for processing the code/sketches that are programmed into it. The model of microcontroller, printed on the top, can be used to identify the board.
The microcontroller 328p offers you to use the block based programming software.
Software download:-
Block Based:-
Block-based coding or programming utilizes a drag-and-drop learning environment, where programmers use coding instruction “blocks” to design logics. It’s an entry-level activity, where kids can gain a foundation in computational thinking through visuals.
For downloading the block based software click here.
Text Based:-
Text-based coding is essentially typing instructions in a programming language following a syntax. Syntax is the grammar and spelling rules of a programming language.
For downloading the text based software click here.
Firmware and library installation:-
Board installation:-
The installation method requires Arduino IDE version 1.6.4 or greater.
- Open Arduino go to File > Preferences menu item.
- Enter the following URL in Additional Boards Manager URLs:
https://mcudude.github.io/MiniCore/package_MCUdude_MiniCore_index.json
- Open the Tools > Board > Boards Manager… menu item.
- Search for MiniCore and install it.
Library Installation:-
Download the required libraries:-
- Open Arduino go to Sketch> Include Library> Add .zip library menu item.
- You will be prompted to select the library you would like to add.
- Navigate to the .zip file’s location and open it.
Firmware Installation:-
Their are two process by which you can install the firmware in your CPU board, let’s see them one by one.
For downloading the firmware click here.
- You can follow the library installation method by which you can include the .zip file as the library and you can then open it from the example section.
- Secondly, you can directly extract the .zip file and open the .ino and upload the code in the CPU board.
Know your pins:-
The CPU of the modular kit is a microcontroller board which is based on the ATmega328P / ATmega168P(datasheet). It has 4 ports of which port 3 can be used as PWM output, port 1 can be used for Bluetooth communication and port 2 has analog input pins.
For downloading the Pin reference sheet click here.
For downloading the Library reference sheet click here.
Coding:-
The machine kit comes with an programmable CPU that can be programmed using block based or text based programming platforms as well as you can also be program using the programming languages C, C++ and python.
Creating UI for remote car:-
User interface (UI) is any method or means by which the end-user of a product interacts with, or controls the device. User interface is designed to allow humans to control machines effectively and efficiently, and good UI should make the interaction between the user and the product as smooth, effortless and enjoyable as possible.
UX designing of remote car:-
UX is responsible for ensuring that a product works for its users, that user experience is at the forefront of design, and that customer satisfaction is not just considered but is championed, throughout the development process.
Learn more about DIY Stem Kits
