

Firebase is a popular platform for building web and mobile applications. It provides a suite of tools and services that make it easy to develop high-quality apps quickly. Firebase is also highly scalable and flexible, making it an excellent choice for start-ups and enterprises alike.
In this blog post, we’ll show you how to get started with Firebase and Python. We’ll walk you through the steps you need to take to configure your Firebase project, authenticate your Python script with Firebase, and use Firebase services such as the Realtime Database, Cloud Firestore, and Cloud Storage in your Python script.
Step 1: Creating a Firebase Project
To get started with Firebase, you first need to create a Firebase project. To do this, go to the Firebase console and sign in with your Google account. Once you’ve signed in, click the “Create Project” button and follow the instructions to set up your project.

A. Follow the below instruction to create a new project on Firebase.

-Disable the option “Enable Google Analytics” for this project as it is not required and then click on Cre
ate project button.
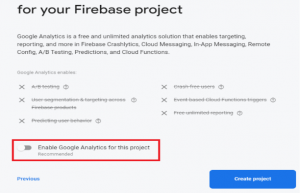
-It will take a few seconds to set up your project. Then, click Continue when it’s ready

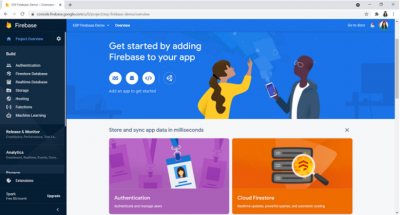
-You’ll be redirected to your Project console page, as shown below.
B. Set Authentication Methods: – On the left sidebar, click on Authentication and then on Get Started.
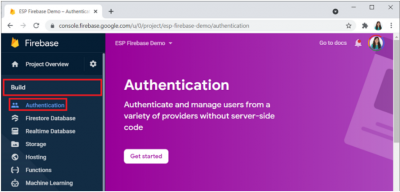
There are several authentication methods like email and password, Google Account, Facebook account, and others. For testing purposes, we can select the Anonymous user (require authentication without requiring users to sign in first by creating temporary anonymous accounts). Enable that option and click on Save button.

C. Creating a Real-time Database: – The next step is to create a Real-time Database for your project. To set up a database, click on Real-time Database shown at the left sidebar and then click on Create Database.

Select your database location. It should be the closest to your current location.

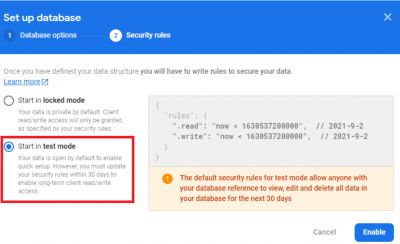
Set up security rules for your database. For testing purposes, select Start in test mode. In later tutorials, you’ll learn how to secure your database using database rules.
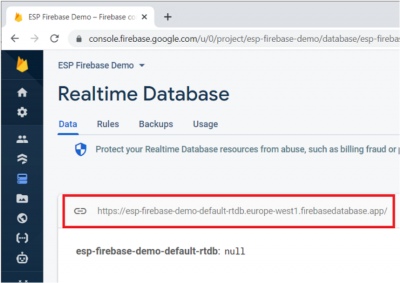
Your database is now created. You need to copy and save the database URL—as highlighted in the image shown below — as you will need it later for your ESP8266 code.
Step 2: Installing the Firebase SDK for Python
To use Firebase with Python, you need to install the Firebase SDK for Python. You can do this using pip, which is the package manager for Python. Open a command prompt or terminal window and run the following command:
This will install the Firebase SDK for Python on your system.
Step 3: Importing Firebase Modules
Once you’ve installed the Firebase SDK for Python, you can import the necessary Firebase modules into your Python script. Here’s an example of how to import the Firebase Real-time Database module:
You can similarly import other Firebase modules, depending on which Firebase services you want to use.
Step 4: Authenticating Your Python Script with Firebase
To use Firebase services in your Python script, you need to authenticate it with Firebase. To do this, you need to generate a service account key and set up environment variables.
Here are the steps to follow:
- Go to the Firebase console and select your project.
- Click the “Settings” icon and then click “Service Accounts”.
- Click the “Generate New Private Key” button to generate a service account key.
- Download the service account key and save it to a safe location on your computer.
- Set up the GOOGLE_APPLICATION_CREDENTIALS environment variable by running the following command in your terminal or command prompt:
Replace “key.json” with your key file to the service account key file you just downloaded.
Step 5: Using Firebase Services in Your Python Script
Now that you’ve authenticated your Python script with Firebase, you can start using Firebase services in your script.
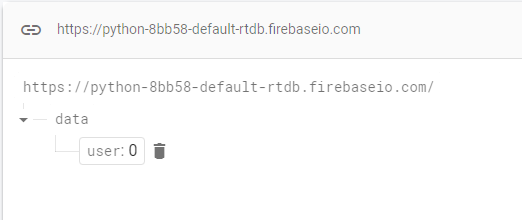
Here’s an example of how to write data to the Firebase Realtime Database using Python:
Step 6: Get a reference to the location in the database where you want to set the data:
Step 7: Set random values using a random library using the set () method on the reference object with an infinite while loop.
You can use a similar code(s) to access other Firebase services such as Cloud Firestore and Cloud Storage.
Step 8: Program the ESP8266 to Interface with Firebase
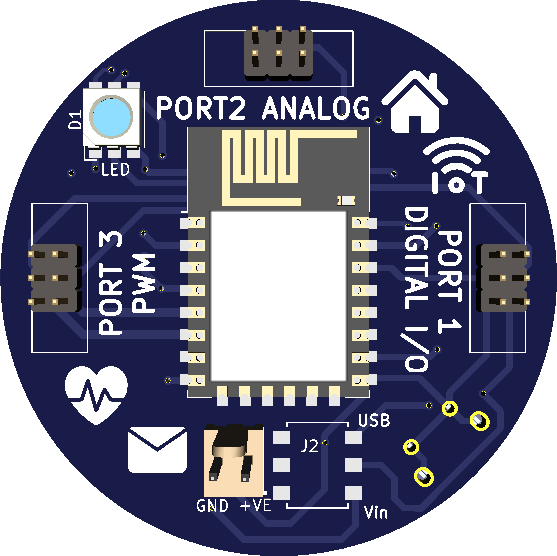
Now that the Firebase Real-time Database is created, you’ll learn how to interface python with the database. To program the ESP8266, you can use Arduino IDE, VS Code with the Platform extension, or other suitable software.If you’re using Arduino IDE, follow the next steps to install the library.
Go to Sketch > Include Library > Manage Libraries
Search for Firebase ESP Client and install the Firebase Arduino Client Library for ESP8266 and ESP32 by Mobitz.

Now, you’re all set to start programming the ESP8266 board to interact with the database.
Upload the code to your ESP8266 board. Don’t forget to insert your network credentials, database URL path, and the project API key.
After uploading the code, open the Serial Monitor at a baud rate of 115200 and press the ESP8266 on-board reset button so it starts running the code.
Congratulations! You’ve successfully stored data in Firebase’s real-time database using the ESP8266. In the next blog, you can learn about how to create an Automatic Door-Locking System using Face recognition via Firebase link
Conclusion:-
In the above blog, we have learned how to create a real-time database using Firebase Realtime Database and Python, and how to use an ESP8266 board to send and receive data from the database. Firebase Realtime Database is a powerful tool for real-time data synchronization and can be easily integrated into your Python projects. ESP8266 is a low-cost microchip with Wi-Fi capabilities that can be programmed using the Arduino IDE. By combining Firebase Realtime Database and ESP8266, we can create powerful IoT applications that can interact with a cloud database in real time.

Leave A Comment
Related Posts
Coding is generally considered a boring activity. After all, who wants to sit in front of a computer all day writing in a language that can’t even be read? But that is not all there is to code. It can be used for some really fun coding facts stuff, and there is so much amazing work that you can do only if you knew how to code.
5 Coding Facts That Blow Your Mind
Let us look at five great fun coding facts you might not know about coding.
You Can Make Games With Code
Coding is an umbrella term for the scores of languages and their versions that programmers use to make their applications. We have all played games, on consoles, our mobile phones, or our desktop computers and laptops, at some point in our life. It might not surprise you to know that these games are also created using code. The complex physics of the characters in these games, the design of the environment of the games, and each minute movement in the games have a piece of code behind them.
Game designers typically write in languages such as C++, C#, and Java. These are also some of the most popular kids coding languages, especially for children who like gaming. Coding courses are available widely in all of these languages and the broad domain of game design.
You Do Better At School If You Code
Making games and indulging in the fun applications of coding is all fine, but coding can have great advantages at school as well. Once you start taking classes that teach coding for kids, you will realize that coding requires a lot of brainpower as well. Coding even for the most fun tasks requires you to think quite a bit, and this sharpens your mind and increases your capability to think logically.
This logical capability can be of a lot of use to you at school. Especially in subjects like mathematics, you might find yourself topping the class simply because of the practice you got during coding! In fact, coding and mathematics have a kind of symbiotic relationship – what you learn in maths comes of use in code and vice versa.
You Can Follow Your Interest Using Coding
Regardless of what your favorite subject is, or what fields you are interested in, you will find a use for code everywhere. Be it through developing software, creating an all-new app, making a game, or building a simple utility, you will find that coding facts can be a way to enable you to follow your interests through a different path.
All subjects from science to social studies and from mathematics to philosophy use coding in some way for research or education. Be it sports or music, art or architecture, utilities that are made using code are prevalent in every field that you can think of. Taking simple online coding courses can qualify you and build your interest in creating such utilities.
You Can Predict Future Events Through Code
Did you know that predicting the future is an application of coding! Predictive modeling is a field of programming in which code is used to try and predict what will happen in the future on the basis of events that took place in the past. It uses concepts of artificial intelligence and machine learning to create algorithms that learn the behavior of past data and determine the course of future data.
Predictive modeling is one of the most futuristic applications of code and is used to determine everything from the next movie you will like on Netflix to whether it will rain tomorrow. You can opt for closing classes in machine learning to know more about the field, and create your own utilities to predict the future!
Coding Is Free!
You don’t need any sophisticated apparatus except your laptop for coding. All you need is the will to learn more and follow your interests through code. To learn to code you do not need to go to a special school or have any special capabilities. You can opt for free coding classes for kids which are held completely online and follow a completely hands-off approach in helping kids learn to code. There are also a vast number of coding sites for kids on which they can log in to learn basic coding facts for kids without even having to enroll in a class.
Conclusion
The future is already being written, and it is being written in code. Coding for kids classes can help kids of all ages currently going to school not just learn to code but also to have fun in the process. The above applications of code can be a major stepping stone to build the interest of kids in coding, after which they can hone their interests and new skills on even more advanced applications. A platform such as Learningbix can be an excellent way for you to get started.