

Introduction:
Are you tired of fumbling for your keys every time you come home? Do you worry about losing them or leaving them behind? If so, you may be interested in building an automatic door-unlocking system with facial recognition. With this system, you can unlock your door simply by looking at it, and you don’t need to worry about carrying keys around with you.
In this blog post, we will show you how to build an automatic door-unlocking system with facial recognition using Python, Firebase, and OpenCV. We will start with an overview of the system, then walk you through the steps of setting it up.
Overview of the System
The automatic door unlocking system with facial recognition that we will be building consists of three main components:
- A camera that captures an image of your face
- A facial recognition algorithm that recognizes your face from the video capture
- An electronic lock that unlocks the door
We’ll be using OpenCV, an open-source computer vision library, to capture and process images from the camera. The facial recognition algorithm will be implemented using Python’s face recognition library, which is built on top of OpenCV. Finally, we’ll use Firebase to store information about authorized faces and to control the electronic lock.
Setting up the System
Before we can start building the automatic door-unlocking system with facial recognition, we’ll need to set up the hardware and software components. Here are the steps:
Hardware Setup:
Install a computer camera: The first step is to install a computer camera that can capture an image of your face. You can use any camera that is compatible with OpenCV, such as a webcam.
Install an electronic lock: Next, you’ll need to install an electronic lock that can be controlled by Firebase. For this project, we’ll be using an ESP8266 as our hardware device to control the lock. We won’t go into detail about the lock installation here, as it will depend on the specific lock you choose.
Software Setup:
Install Python: To implement the facial recognition algorithm, you’ll need to install Python 3.7 or higher on your computer.
Install OpenCV: Once you have Python installed, you’ll need to install OpenCV. You can do this using pip, the package installer for Python, by running the following command in the terminal:
Install the Firebase SDK: We’ll be using Firebase to store authorized faces and control the electronic lock. To use Firebase with Python, we’ll need to install the Firebase SDK. Run the following command in your terminal:
Set up Firebase Project:
- Go to the Firebase console: Go to the Firebase console at https://console.firebase.google.com/ and log in with your Google account.
- Create a new project: Click on the “Add project” button to create a new project.
- Enter project details: Enter a name for your project, select your country/region, and click “Create Project”.
- Enable the Realtime Database: Once the project is created, click on the “Develop” menu on the left-hand side of the Firebase console, then select “Database”. From here, click “Create Database” and select “Start in test mode”. Choose a location for your database and click “Done”.
You can refer to the blog Building Cloud-Connected Devices with Firebase, ESP8266, and Python for detailed instructions on how to build a Firebase Project.
Part 1: Implementing the Facial Recognition Algorithm:
Now that we have the hardware and software components set up, we can move on to implementing the facial recognition algorithm. Here are the steps:
Step 1: Capture an image of your face: Use OpenCV to capture an image of your face from the camera.
Step 2: Load the face cascade classifier: First, you need to load the Haar Cascade classifier for face detection in OpenCV. You can download the classifier file from the OpenCV GitHub repository Link:-https://github.com/opencv/opencv/blob/master/data/haarcascades/haarcascade_frontalcatface.xml
Step 3: Start a while loop that will keep running until the user presses the ‘q’ key:
Step 4:Integrating with Firebase: Finally, we need to integrate the system with Firebase to store the logs of authorized entries and lock/unlock events. We will use the Firebase Realtime Database to store this data. To integrate the system with Firebase, we need to create a Python script that sends the logs and events to the Firebase database.
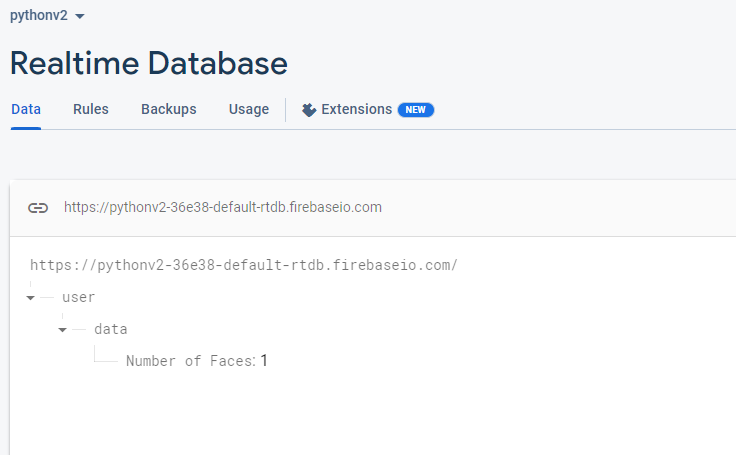
Output:-
In these steps, we utilize the Python face recognition script to upload the number of recognized face values on Firebase. The value uploaded is dependent on how many faces the camera recognizes.
Part 2: Set up the ESP8266, Servo Driver & Servo Motor
CPU, Servo Driver, Servo Motor
Note: For the Installation of ESP8266 with Arduino IDE in detail follow this link:-
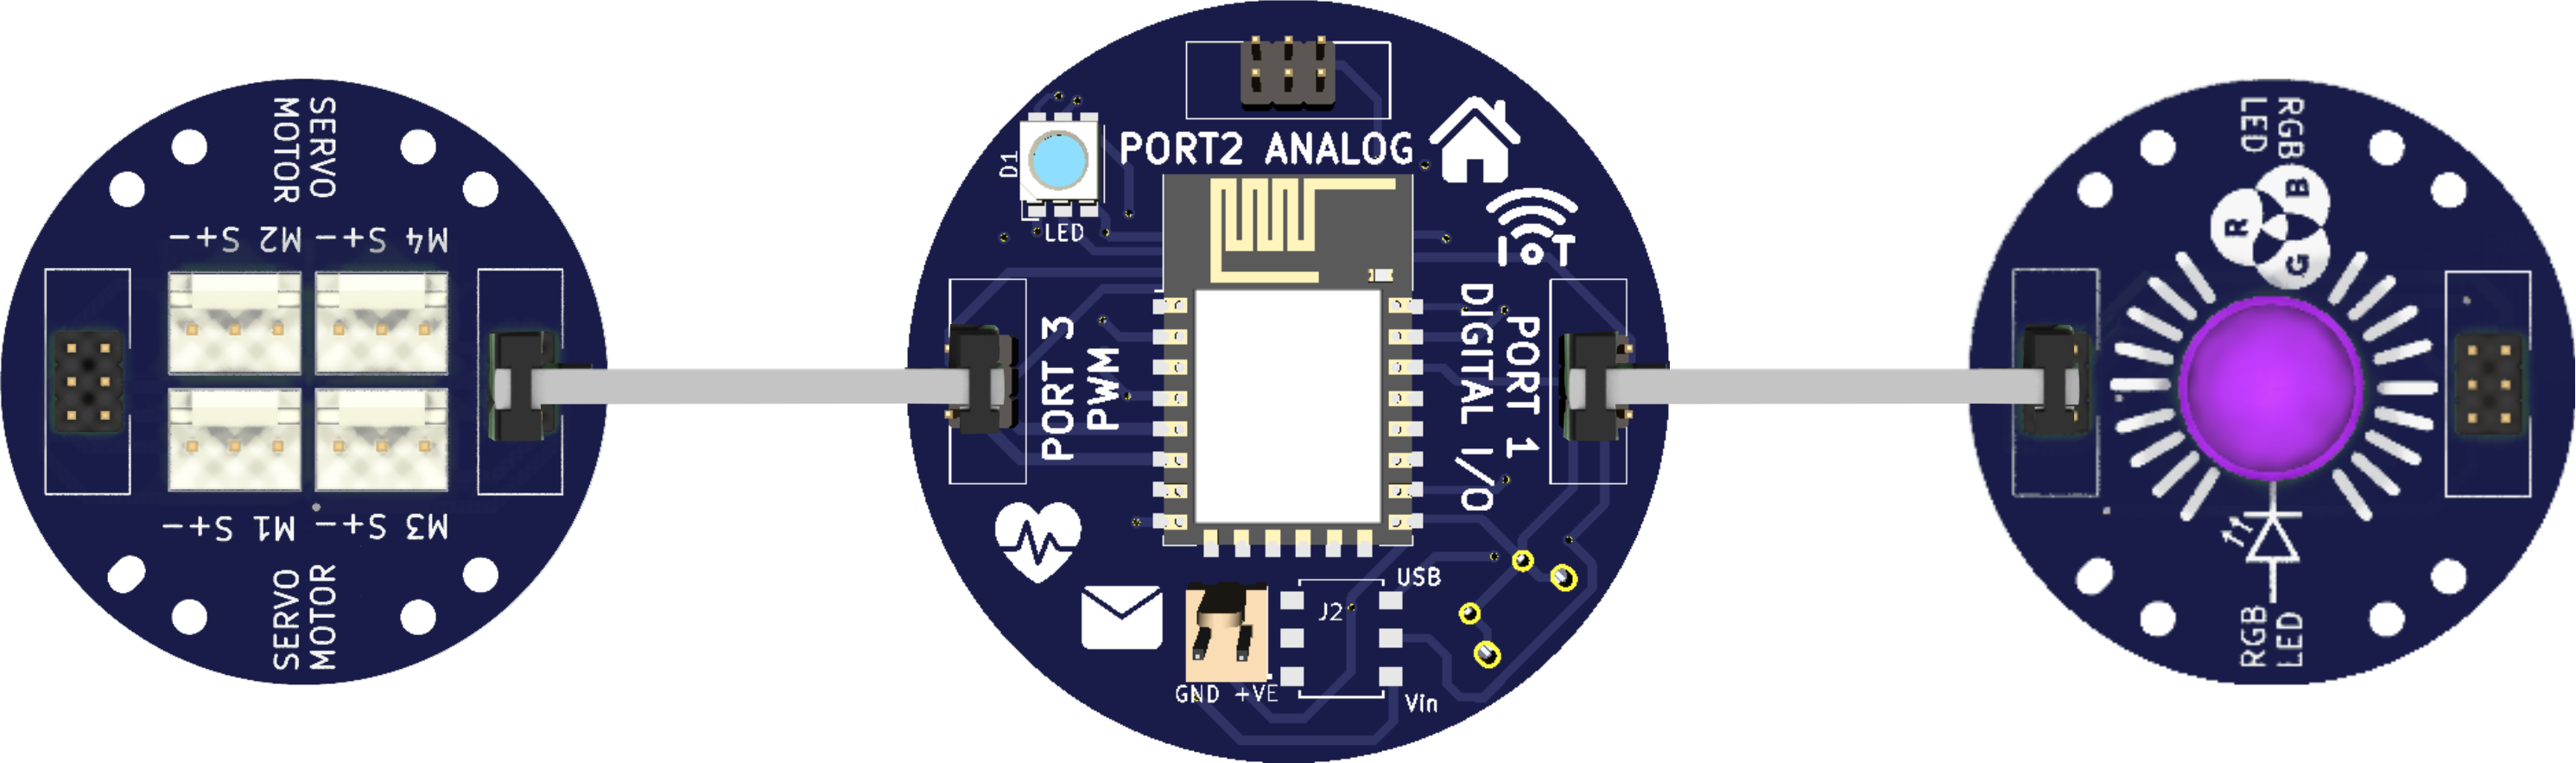
Step 1. Connect the servo motor to the ESP8266: First, you’ll need to connect the servo motor driver to the ESP8266 Microcontroller Board. You can use port 3 on the ESP8266 to connect the servo motor driver. Make sure to connect the signal wire of the servo motor to the Servo motor driver, you want to use for controlling the servo.
Hardware Image
Step 2. Import the necessary libraries: Next, you’ll need to import the necessary libraries for controlling the servo motor and connecting to the Firebase real-time database. You can use the Servo library for controlling the servo motor and the Firebase Arduino library for connecting to the Firebase real-time database.
Step 3. Define Wi-Fi network credentials using #define directive, include ESP8266WiFi library, and use WiFi.begin the () method in setup() function to connect to Wi-Fi network in Arduino IDE for ESP8266.
Step 4. Connect to the Firebase real-time database: In your ESP8266 code, you’ll also need to connect to the Firebase real-time database using the FirebaseArduino library. You can use the Firebase.begin() function to connect to the Firebase real-time database and authenticate your Firebase account.
Step 5. Read the door unlock command: Once you’re connected to the Firebase real-time database, you can use the Firebase.getString() function to read the door unlock command from the “door_unlock_command” field you created earlier. The Firebase.getString() function returns the value of the specified Firebase database field as a string.
Step 6.Control the servo motor based on the door unlock command: Finally, you will need to use conditional statements to check the value of the door unlock command and control the servo motor accordingly. If the value of the face is greater than 0 you can use the Servo.write() function to turn the servo motor to unlock the door. If the value of the face in the camera is zero, you can use the Servo.write() function to turn the servo motor to lock the door.
Full Code :-
Full Video for This Project:
Conclusion:
In this blog post, we’ve shown you how to build your own automatic door-unlocking system with facial recognition using Python, Firebase, and OpenCV, with an ESP8266 as the hardware device. With this system, you can add an extra layer of security to your home or office and never have to fumble for your keys again. While the implementation we’ve presented here is fairly basic, there are many ways to customize and enhance this system to meet your specific needs. We hope this blog post has inspired you to experiment with face recognition technology and IoT and to create your own innovative solutions.

Leave A Comment
Related Posts
Coding is generally considered a boring activity. After all, who wants to sit in front of a computer all day writing in a language that can’t even be read? But that is not all there is to code. It can be used for some really fun coding facts stuff, and there is so much amazing work that you can do only if you knew how to code.
5 Coding Facts That Blow Your Mind
Let us look at five great fun coding facts you might not know about coding.
You Can Make Games With Code
Coding is an umbrella term for the scores of languages and their versions that programmers use to make their applications. We have all played games, on consoles, our mobile phones, or our desktop computers and laptops, at some point in our life. It might not surprise you to know that these games are also created using code. The complex physics of the characters in these games, the design of the environment of the games, and each minute movement in the games have a piece of code behind them.
Game designers typically write in languages such as C++, C#, and Java. These are also some of the most popular kids coding languages, especially for children who like gaming. Coding courses are available widely in all of these languages and the broad domain of game design.
You Do Better At School If You Code
Making games and indulging in the fun applications of coding is all fine, but coding can have great advantages at school as well. Once you start taking classes that teach coding for kids, you will realize that coding requires a lot of brainpower as well. Coding even for the most fun tasks requires you to think quite a bit, and this sharpens your mind and increases your capability to think logically.
This logical capability can be of a lot of use to you at school. Especially in subjects like mathematics, you might find yourself topping the class simply because of the practice you got during coding! In fact, coding and mathematics have a kind of symbiotic relationship – what you learn in maths comes of use in code and vice versa.
You Can Follow Your Interest Using Coding
Regardless of what your favorite subject is, or what fields you are interested in, you will find a use for code everywhere. Be it through developing software, creating an all-new app, making a game, or building a simple utility, you will find that coding facts can be a way to enable you to follow your interests through a different path.
All subjects from science to social studies and from mathematics to philosophy use coding in some way for research or education. Be it sports or music, art or architecture, utilities that are made using code are prevalent in every field that you can think of. Taking simple online coding courses can qualify you and build your interest in creating such utilities.
You Can Predict Future Events Through Code
Did you know that predicting the future is an application of coding! Predictive modeling is a field of programming in which code is used to try and predict what will happen in the future on the basis of events that took place in the past. It uses concepts of artificial intelligence and machine learning to create algorithms that learn the behavior of past data and determine the course of future data.
Predictive modeling is one of the most futuristic applications of code and is used to determine everything from the next movie you will like on Netflix to whether it will rain tomorrow. You can opt for closing classes in machine learning to know more about the field, and create your own utilities to predict the future!
Coding Is Free!
You don’t need any sophisticated apparatus except your laptop for coding. All you need is the will to learn more and follow your interests through code. To learn to code you do not need to go to a special school or have any special capabilities. You can opt for free coding classes for kids which are held completely online and follow a completely hands-off approach in helping kids learn to code. There are also a vast number of coding sites for kids on which they can log in to learn basic coding facts for kids without even having to enroll in a class.
Conclusion
The future is already being written, and it is being written in code. Coding for kids classes can help kids of all ages currently going to school not just learn to code but also to have fun in the process. The above applications of code can be a major stepping stone to build the interest of kids in coding, after which they can hone their interests and new skills on even more advanced applications. A platform such as Learningbix can be an excellent way for you to get started.