

PyTorch Library:-
PyTorch is a powerful open-source library for deep learning and artificial intelligence. It is one of the most popular libraries for machine learning and data scienceused for making AI Virtual Assistant. With PyTorch, you can create a smart virtual assistant that can answer questions, provide recommendations, and even take action.
The first step in designing your own smart virtual assistant is deciding what tasks you want the assistant to perform. Do you want it to answer basic questions about products or services? Do you want it to suggest specific items or services based on user input? Or do you want it to take action on certain commands?
Once you’ve decided what tasks you want your assistant to perform, you’ll need to create a dataset of questions and answers that the assistant can use to learn. This dataset should include questions and answers in natural language, as well as data that can be used to recognize user input.
Use PyTorch to create a deep learning model. This model will be used to recognize patterns in user input and to generate appropriate responses. You can also use the model to suggest specific items or services based on user input. Finally, you’ll need to create a user interface for
How to Install PyTorch Library?
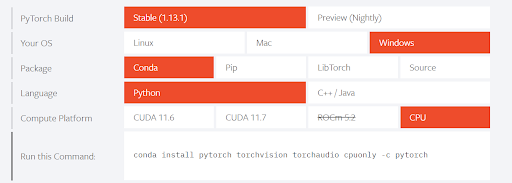
Select your preferences and run the install command. Stable represents the most currently tested and supported version of PyTorch. This should be suitable for many users. Preview is available if you want the latest, not fully tested and supported builds that are generated nightly. Please ensure that you have met the prerequisites below (e.g., NumPy), depending on your package manager. Anaconda is our recommended package manager since it installs all dependencies. You can also install previous versions of PyTorch. Note that LibTorch is only available for C++.
Installing PyTorch Library with CPU and Conda Environment
Command: conda install pytorch torchvision torchaudio cpuonly -c pytorch
Installing PyTorch Library with CPU and PIP Environment
Command: pip3 install torch torchvision torchaudio
Deep Neural Network: A deep neural network (DNN) is an artificial neural network (ANN) with multiple layers between the input and output layers. The additional layers enable the network to learn more complex functions and abstractions than a single-layer neural network. DNNs are used in a variety of applications, including computer vision, speech recognition, natural language processing, audio recognition, social network filtering, bioinformatics, drug design, medical diagnosis and many other areas.
How is the Neural Network represented?
A neural network consists of many Nodes (Neurons) in many layers. Each layer can have any number of nodes and a neural network can have any number of layers.
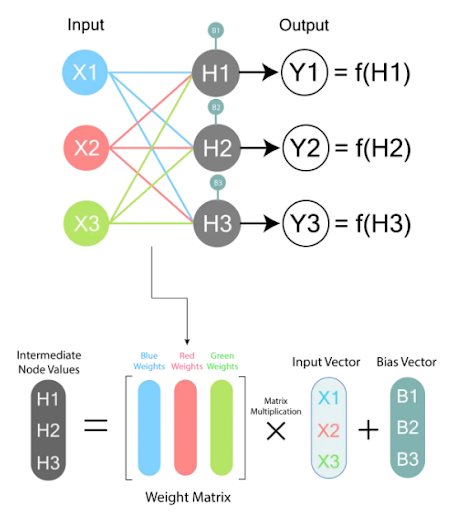
Key Terms used in Neural Network
Y – Final Value of Node
W – Represents the weight between the Node and previous Layer Output Node
X – Value of Node
B – Represents bias, which is an additional value present for each neuron.
H – is the intermediate node value. This is not the final value of the node.
f( ) – Is called an Activation Function and it is something we can choose. 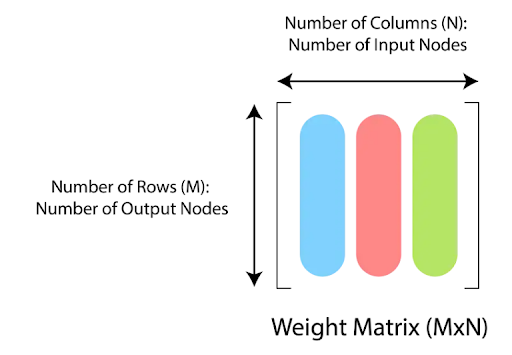

Single Layer Multiple Layer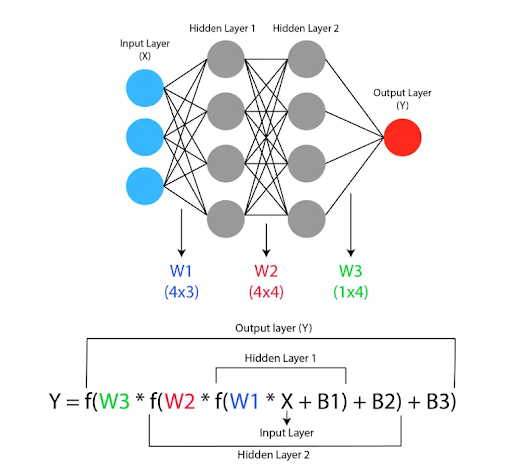
Complete Neural Network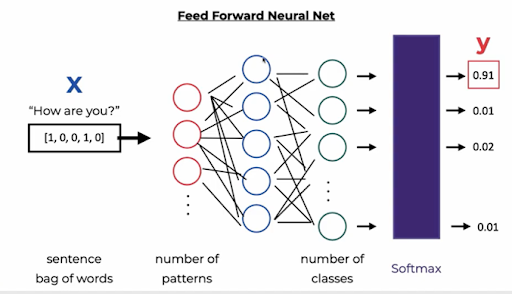
Steps to Make Your Own Smart Virtual Assistant with PyTorch Python Library
Step 1. Install numpy and pytorch library.
Pytorch: Go to https://pytorch.org/ and find the install command for your system.
Step 2. First, we preprocess the chatbot data by nltk tools.
Note: Make data preprocessing function with nltk_utils python file.
Step 3. Now, create a json file for making data in a structured way. with intent and response tag.
Step 4. Make a new Python file to train the data with pytorch library.
A. Import necessary library for train_data python file.
B. Open json data file in read mode with python.
Now we can access this json file in a dictionary form.
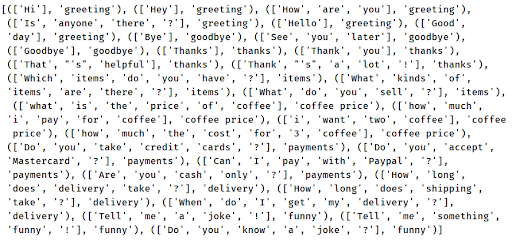
Step 5. Now, find tags and all words for all intent tag pattern formats.
Output:-
All words in pattern:-
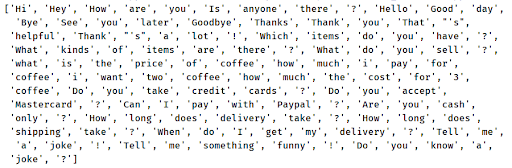
Number of tags in intent: 8
All words with respective tags:
Step 6. Ignore special characters from all word bags.
Step 7. Bag of Words
Now we make a bag of words for each tag of the pattern. So define a function for bag of words in nltk_utils python file.
Step 8: Now, create a Training Data Set.
Step 9: Convert x_train & y_train data into numpy arrays.
Step 10: After this, make a model for the training dataset.
Step 11: Make a class chatdatset (dataset) to create data in n_samples variable.
Step 12: Call chatdataset() class and load our dataset with dataloader function.
Step 13: Now, define the device specification and model.
Step 14. Training Model Iteration
Now, iterate the data 1000 times with a learning rate 0.01 to reduce the error as much as possible.
Step 15. Save the model in a file.
Steps to Define a Neural Network
Step 1. Create New File for Neural Network
Make a new file to define a neural network model. In this file make import torch.nn class to make Neural network Model.
Step 2. Now, make a new python file to run our whole program to chat with chatbot.
A. Import necessary libraries.
B. Import train model file.
C. Now, define neural net model from model Python file.
D. After this, make a bot with the name “Sam” with While Loop.
Output:-
Pending
Conclusion :-
Creating your own smart virtual assistant with the PyTorch Python Library is a great way to explore the fundamentals of AI and deep learning. By leveraging the power of the PyTorch framework, you can create a virtual assistant that can be used to automate tasks and make intelligent decisions. With the right guidance and a bit of patience, you can create a powerful and efficient virtual assistant to help you complete any task.
Need to know more about AI ML – then visit – blog.learningbix.com

Leave A Comment
Related Posts
Coding is generally considered a boring activity. After all, who wants to sit in front of a computer all day writing in a language that can’t even be read? But that is not all there is to code. It can be used for some really fun coding facts stuff, and there is so much amazing work that you can do only if you knew how to code.
5 Coding Facts That Blow Your Mind
Let us look at five great fun coding facts you might not know about coding.
You Can Make Games With Code
Coding is an umbrella term for the scores of languages and their versions that programmers use to make their applications. We have all played games, on consoles, our mobile phones, or our desktop computers and laptops, at some point in our life. It might not surprise you to know that these games are also created using code. The complex physics of the characters in these games, the design of the environment of the games, and each minute movement in the games have a piece of code behind them.
Game designers typically write in languages such as C++, C#, and Java. These are also some of the most popular kids coding languages, especially for children who like gaming. Coding courses are available widely in all of these languages and the broad domain of game design.
You Do Better At School If You Code
Making games and indulging in the fun applications of coding is all fine, but coding can have great advantages at school as well. Once you start taking classes that teach coding for kids, you will realize that coding requires a lot of brainpower as well. Coding even for the most fun tasks requires you to think quite a bit, and this sharpens your mind and increases your capability to think logically.
This logical capability can be of a lot of use to you at school. Especially in subjects like mathematics, you might find yourself topping the class simply because of the practice you got during coding! In fact, coding and mathematics have a kind of symbiotic relationship – what you learn in maths comes of use in code and vice versa.
You Can Follow Your Interest Using Coding
Regardless of what your favorite subject is, or what fields you are interested in, you will find a use for code everywhere. Be it through developing software, creating an all-new app, making a game, or building a simple utility, you will find that coding facts can be a way to enable you to follow your interests through a different path.
All subjects from science to social studies and from mathematics to philosophy use coding in some way for research or education. Be it sports or music, art or architecture, utilities that are made using code are prevalent in every field that you can think of. Taking simple online coding courses can qualify you and build your interest in creating such utilities.
You Can Predict Future Events Through Code
Did you know that predicting the future is an application of coding! Predictive modeling is a field of programming in which code is used to try and predict what will happen in the future on the basis of events that took place in the past. It uses concepts of artificial intelligence and machine learning to create algorithms that learn the behavior of past data and determine the course of future data.
Predictive modeling is one of the most futuristic applications of code and is used to determine everything from the next movie you will like on Netflix to whether it will rain tomorrow. You can opt for closing classes in machine learning to know more about the field, and create your own utilities to predict the future!
Coding Is Free!
You don’t need any sophisticated apparatus except your laptop for coding. All you need is the will to learn more and follow your interests through code. To learn to code you do not need to go to a special school or have any special capabilities. You can opt for free coding classes for kids which are held completely online and follow a completely hands-off approach in helping kids learn to code. There are also a vast number of coding sites for kids on which they can log in to learn basic coding facts for kids without even having to enroll in a class.
Conclusion
The future is already being written, and it is being written in code. Coding for kids classes can help kids of all ages currently going to school not just learn to code but also to have fun in the process. The above applications of code can be a major stepping stone to build the interest of kids in coding, after which they can hone their interests and new skills on even more advanced applications. A platform such as Learningbix can be an excellent way for you to get started.